
Cables are the highest-consequence wear item in any gym. A treadmill belt that fails inconveniences a user; a loaded cable that fails releases stored energy instantly and can cause serious injuries. Commercial facilities that follow industry best practice inspect cables on a documented schedule and replace them on condition — not after failure — and document both the inspection and the technician's qualifications.
This guide from the NCFET certified technician team establishes the professional inspection sequence, the rejection criteria that require immediate out-of-service action, the pulley and weight stack checks that are inseparable from cable inspection, and the replacement procedure for selectorized machines, cable crossovers, and functional trainers. These are the standards taught in NCFET's strength equipment curriculum.
How gym cables are built — and how they fail progressively
Fitness machine cables are stranded steel wire rope — commonly 3/16" diameter in a 7×19 construction (seven strands, each of nineteen wires) — jacketed in nylon or vinyl and terminated with swaged fittings and ball ends. The 7×19 construction provides flexibility for pulley bends but does not tolerate kinking; a single kink permanently disrupts internal load sharing across the strands.
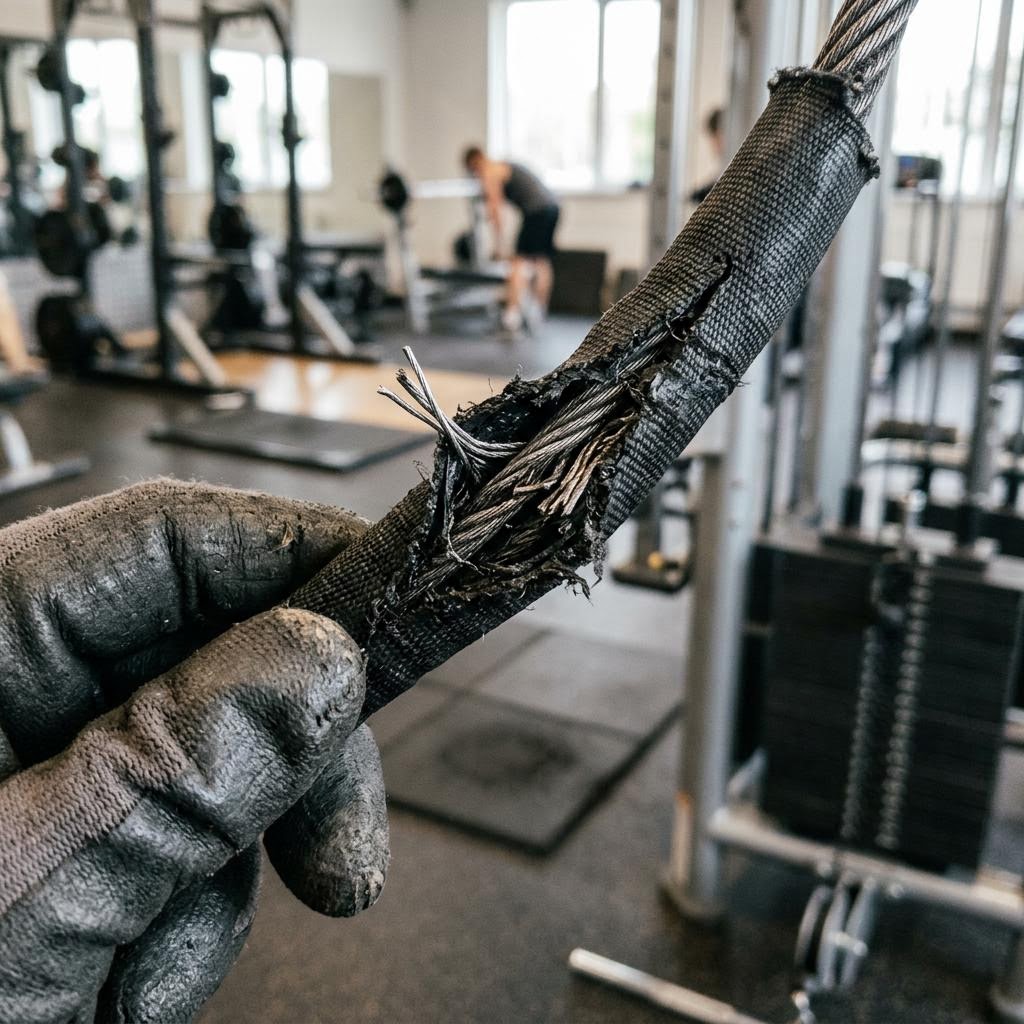
Cables fail progressively, not suddenly. Individual wire strands break first, typically inside the jacket at the highest-flex points (pulley contact arcs and terminations). The jacket then bulges, cracks, or flattens where strand breaks have reduced the core diameter. This progression from first broken strand to separation takes time — which is exactly what makes scheduled inspection effective. An undetected cable that reaches separation under load with a member using the machine is the scenario preventive inspection exists to prevent.
The highest-wear inspection zones are: every pulley contact arc (the cable bends most sharply here), the ball-end termination at the weight stack (cyclic bending stress with every rep), the swaged adjuster end at the handle/attachment point, and anywhere the jacket shows a kink or deformation from a past overload or dropped-weight event.
Rejection criteria: when a cable must come out of service immediately
Each of the following is a stand-alone out-of-service criterion. Finding any one of them requires immediate removal from service, regardless of when the cable was last replaced:
- Any visible broken wire strand — including strands poking through the jacket, 'tenting' the jacket surface, or visible as a broken loop at a termination.
- Jacket cracking, splitting, or persistent bulging anywhere along the cable run. Bulging indicates broken strands below the jacket surface.
- Any kink — a permanent bend or deformation in the cable's axis. Kinks cannot be straightened; they permanently compromise internal load sharing.
- Flattening or diameter reduction — a section that feels crushed or noticeably thinner than the rest of the cable when run through a gloved hand under light tension.
- Corrosion staining bleeding through the jacket or visible rust at the terminations. Surface discoloration of the jacket is cosmetic; rust staining or pitting is structural.
- Any looseness, rotation, or visible movement of a swaged terminal or ball end under light tension — termination integrity is non-negotiable.

Pulley and bearing inspection: the root cause of most cable wear
Cables rarely wear out on their own — misaligned, seized, or groove-worn pulleys destroy them. For every cable inspection, also inspect every pulley in the routing: pin the weight stack to remove cable tension, then spin each pulley by hand. A serviceable pulley spins freely, silently, and without lateral wobble. A pulley with a seizing bearing will drag and possibly squeal; a pulley with a worn or damaged bearing will have perceptible axial or radial play.
Inspect the pulley groove: run a fingertip around the groove surface. A healthy groove is smooth; a worn groove has a rough or ridged surface from the cable scoring it. A grooved pulley will accelerate wear on a new cable and is a mandatory replacement. Replace pulley and bearing together as a set — a new bearing in a grooved housing or a new pulley on a worn bearing shaft both fail prematurely. After replacement, verify cable alignment through the entire routing: the cable must ride the center of every groove without touching the flange.

Weight stack checks that accompany cable inspection
Cable inspection and weight stack condition checks should be performed together — a binding stack overloads the cable on every repetition and will accelerate the cable wear the inspection just found. Check: guide rods are clean and lightly coated with the manufacturer-specified lubricant (never a thick grease that traps dirt); selector pin holes are round and not elongated from side-loading; the top plate bolt is tight; and the stack lifts flat without tilting. A tilting stack binds on the guide rods, creating jerky, high-peak loads that fatigue cables and stress terminations.
Cable replacement procedure (typical selectorized machine)
Isolate stored energy and document routing
This is qualified-technician work. Follow the manufacturer's cable-replacement and energy-control procedure, secure or unload the weight stack with the approved method, and confirm the cable path cannot move before releasing any terminal. Removing the selector pin alone does not make the system safe. Photograph the cable path through every pulley, guard pin, and tie-off point from multiple angles so the new cable can be routed identically.
Note adjuster positions
Record thread engagement length on threaded terminals and any adjuster hardware settings before removing the old cable. These positions establish the working cable length and pre-tension.
Remove old cable and inspect pulleys
Start at the adjustable end, back off the adjuster, and free the cable from each pulley in sequence. This is when you inspect each pulley groove and bearing — the cause of the cable wear is almost always in a pulley, and finding and replacing it is as important as replacing the cable.
Route the new cable exactly
Follow your photos exactly. Cable routed on the wrong side of a guard pin or pulley flange will derail under load or sustain rapid damage from flange contact. Use the cable's factory lubricant coating as-is; do not add additional grease.
Set pre-tension to the manufacturer's specification
Thread the adjuster to achieve slight tension at rest — with the pin at the top plate, the handle or attachment point should have minimal free travel before the plates begin to lift. Where the manufacturer publishes a specification, match it. Tighten the adjuster locknut to torque.
Progressive load test and final check
Run the machine by hand through full travel watching each pulley seat the cable in its groove center. Then test at light load (first few selector plates), confirming smooth operation. Then test at a working load. Re-check cable seating, adjuster engagement, and locknut torque after the heavy test.
Tools & Supplies
- Manufacturer-correct replacement cable (match OEM specification — never substitute a 'close enough' generic length)
- Combination wrenches and Allen/hex key set
- Smartphone or camera (routing documentation)
- Cut-resistant gloves
- Torque wrench for terminal locknuts
Frequently Asked Questions
How often should gym cables be inspected and replaced?
Commercial best practice is a documented visual and hand-tension inspection monthly, with full function tests quarterly. There is no fixed replacement age or mileage — cables are replaced on condition, immediately, the moment any rejection criterion appears: a broken strand, jacket damage, kink, corrosion, or termination movement. High-traffic stations such as lat pulldowns and cable crossovers wear fastest and may warrant more frequent inspection.
Can a frayed or kinked gym cable be repaired?
No. Wire rope with broken strands, kinks, jacket damage, or compromised terminations cannot be safely repaired — the internal load distribution across the strands is permanently disrupted. Replacement with the manufacturer-specified cable and simultaneous pulley inspection is the only professional remedy. Attempting to splice or re-terminate a damaged cable is not an accepted practice.
What are the visual signs that a gym cable needs to be replaced?
Look for: any wire strand poking through or tenting the jacket, jacket cracks or bulges anywhere along the run, a visible kink or permanent bend in the cable axis, corrosion staining bleeding through the jacket, diameter reduction in any section, or any movement of a swaged terminal or ball end when you tug on it. Any single one of these findings requires immediate out-of-service action.
Why does my new cable feel rough or catch in the pulleys?
A common cause is a routing or pulley problem rather than a defective cable: the cable may be riding a pulley flange instead of the groove center, routed on the wrong side of a guard pin, or running over a pulley whose groove is damaged or whose bearing is beginning to seize. Trace the entire routing under light manual load — a correctly routed cable over serviceable pulleys should feel smooth throughout the machine's full range of motion.
Who is qualified to inspect and replace gym cables?
Cable inspection and rejection decisions require knowledge of wire rope failure modes, structural familiarity with the machine's load path, and judgment about when a borderline finding warrants immediate out-of-service action. This level of work should be performed by a trained and credentialed technician. NCFET-certified professionals have specifically trained on these standards, and any credential can be verified at ncfet.com/verify.
Standards & References
- ASTM F2216 — Standard Specification for Selectorized Strength Equipment — Design and safety specification for selectorized (weight stack) strength machines.
- ASTM F2276 — Standard Specification for Fitness Equipment
This guide is provided as a free educational resource by NCFET and its certified technician team. Always follow your equipment manufacturer's service manual, and leave line-voltage electrical work to qualified professionals. You are welcome to cite or link to this guide; please attribute it to the NCFET certified technician team and link to this page.
Related Guides
Need a professional? Or want to become one?
Find qualified service providers in the NCFET directory, verify any technician's credential at ncfet.com/verify, or start your own path to national certification.